ASSIGN To use the ASSIGN mode, hold the Assign button for approximately 2 seconds, the MIDI light will come on solid for a moment and then flash once. This will signify that it is waiting for the first MIDI CC (CC1) to be assigned. Next send a MIDI CC command from your controller, the MIDI light will light solid for a moment, and then flash twice, it will now wait for the second MIDI CC (CC2) to be assigned. If you don’t send anything for a while, the unit will exit the ASSIGN mode and wait for MIDI data as per normal. You have 4 assignable MIDI CCs, by default they are as follows:-
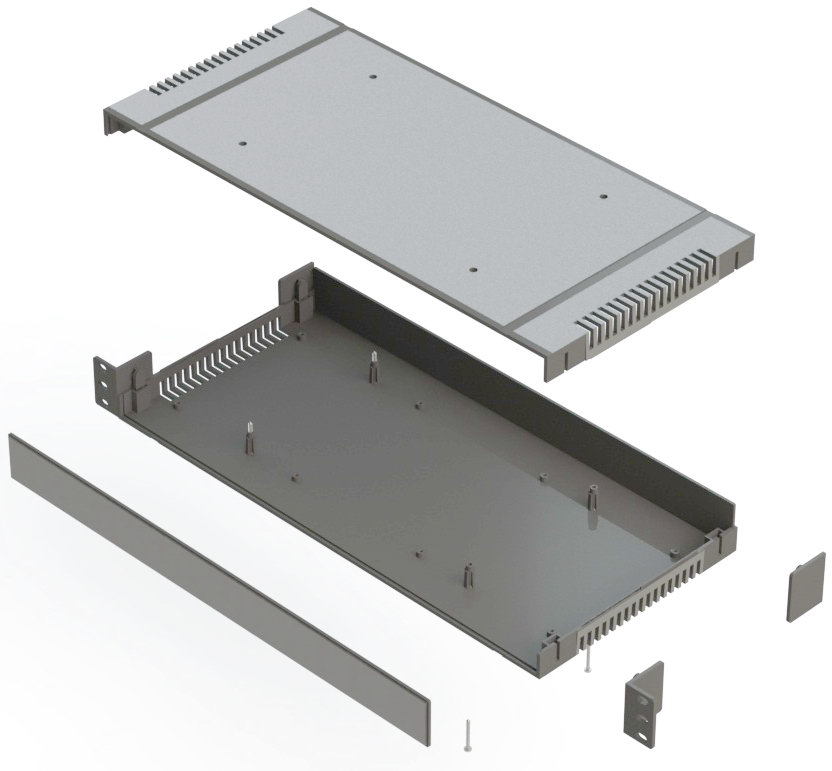
The MIDI LED will light whenever a valid command is received that the PolyDAC(X) acts upon including note data, pitchbend, controller etc. The 4 voice LEDs light when a voice is active. External PITCHBEND and MODULATION WHEEL connections Please refer to the enclosed wiring documents for details on terminating an external PITCHBEND and MODULATION WHEEL. For PolyDAC(X)s fitted with jacks incorporating a double-pole switch the plugs are wired as normal. For PolyDAC(X)s fitted with jacks incorporating only a single-pole switch readers should note that the MODULATION WHEEL connector needs to be wired differently. Options Currently there are no user configurable options but if you need to access inside the unit to update the firmware, change future option settings or re-calibrate the unit then remove the 4 lid fixings screws indicated here and carefully prise the top half of the enclosure away from the bottom half. This drawing shows the 1U rack exploded so that you can see its component parts . |
||||||||||||||||||||||||||||||||||||||||||||||||||||||||||||||||||||||||||||||||||||||||||||||||||||||||||||||||||||||||||||||||||||||||||||||||||||||||||||||||||||||||||||||||||||||||||||||||||||||||||||||||||||||||||||||||||||||||||||||||||||||||||||||||||||||||||||||||||||||||||||||||||||||||||||||||||||||||||||||||||||||||||||||||||||||||||||||||||||||||||||||||||||||||||||||||||||||||||||||||||||||||||||||||||||||||||||||||||||||||||||||||||||||||||||||||||||||||||||||||||||||||||||||||||||||||||||||||||||||||||||||||||||||||||||||||||||||||||||||||||||||||||||||||||||||||||||||||||||||||||||||||||||||||||||||||
MIDI-CV MIDI Note Table
Half-tone factor = 1.05946309 Table based on A = 440Hz = A4
|
||||||||||||||||||||||||||||||||||||||||||||||||||||||||||||||||||||||||||||||||||||||||||||||||||||||||||||||||||||||||||||||||||||||||||||||||||||||||||||||||||||||||||||||||||||||||||||||||||||||||||||||||||||||||||||||||||||||||||||||||||||||||||||||||||||||||||||||||||||||||||||||||||||||||||||||||||||||||||||||||||||||||||||||||||||||||||||||||||||||||||||||||||||||||||||||||||||||||||||||||||||||||||||||||||||||||||||||||||||||||||||||||||||||||||||||||||||||||||||||||||||||||||||||||||||||||||||||||||||||||||||||||||||||||||||||||||||||||||||||||||||||||||||||||||||||||||||||||||||||||||||||||||||||||||||||||
Back To Product Page |

© Copyright 2000. All rights reserved. Revised: August 26, 2024